本文结构图:
除了类本身,设计模式更强调多个类/对象之间的关系和交互过程——比接口/类复用的粒度更大
创建型模式(Creational patterns)
工厂方法模式(Factory Method pattern)
工厂方法也被称作虚拟构造器 (Virtual Constructor)
即定义一个用于创建对象的接口,让子类类决定实例化哪个类,也就是说,工厂方法允许类将实例化推迟到子类
什么时候用?
当使用者不确定要创建哪个具体类的具体实例,或者不想在代码中指明要具体创建的实例时,用工厂方法
举例
设计一个Trace接口:
1
2
3
4
5
6
7
8
public interface Trace { public void setDebug ( boolean debug ) ; public void debug ( String message ) ; public void error ( String message ) ; }
我们可能要设计两种实现,比如将信息直接打印到屏幕,或者输出到文件:
1 2 3 4 5 6 7 8 9 10 11 12 13 14 15 16 17 18 19 20 21 22 23 24 25 26 27 28 29 30 31 32 33 34 35 36 public class FileTrace implements Trace { private PrintWriter pw; private boolean debug; public FileTrace () throws IOException { pw = new PrintWriter ( new FileWriter ( "t.log" ) ); } public void setDebug ( boolean debug ) { this .debug = debug; } public void debug ( String message ) { if ( debug ) { pw.println( "DEBUG: " + message ); pw.flush(); } } public void error ( String message ) { pw.println( "ERROR: " + message ); pw.flush(); } } public class SystemTrace implements Trace { private boolean debug; public void setDebug ( boolean debug ) { this .debug = debug; } public void debug ( String message ) { if ( debug ) System.out.println( "DEBUG: " + message ); } public void error ( String message ) { System.out.println( "ERROR: " + message ); } }
那么用户要怎么使用呢?
1 2 3 4 5 Trace log1 = new SystemTrace ();log1.debug("entering log" ); Trace log2 = new FileTrace ();log2.debug("... " );
这样做,客户端在创建对象时就要指定具体实现类,也就是说客户端的代码与实现类紧密耦合 ,如果有了新的具体类添加时,客户端的代码很可能也要修改
那么利用工厂方法 该怎么实现呢?
先设计一个用于创建对象的接口:
1
2
3
4
interface TraceFactory { Trace getTrace () ; void otherOperation () ; }
然后分别设计两个工厂类 ,并设计工厂方法 返回对应的具体类:
1
2
3
4
5
6
7
8
9
10
11
public class SystemTraceFactory implements TraceFactory { public Trace getTrace () { ... return new SystemTrace (); } } public class FileTraceFactory implements TraceFactory { public Trace getTrace () { return new FileTrace (); } }
客户端使用工厂方法 来创建实例,这样在有新的具体产品类加入时,可以增加新的工厂类或修改已有工厂类,不会影响到客户端代码,这样使用:
1 2 3 4 5 Trace log1 = new SystemTraceFactory ().getTrace();log1.debug("entering log" ); Trace log2 = new FileTraceFactory ().getTrace();log2.debug("..." );
当然也可以有另一种实现方式,根据类型决定创建哪个具体产品
1
2
3
4
5
6
7
8
9
10
11
12
interface TraceFactory { Trace getTrace (String type) ; void otherOperation () ; } public class Factory implements TraceFactory { public getTrace (String type) { if (type.equals("file" ) return new FileTrace (); else if (type.equals("system" ) return new SystemTrace (); } }
客户端代码:
1
2
3
Trace log = new Factory ().getTrace("system" );log.setDebug(false ); log.debug("..." );
甚至可以直接用静态工厂方法 实现:
1
2
3
4
5
6
7
8
9
10
11
12
13
public class SystemTraceFactory { public static Trace getTrace () { return new SystemTrace (); } } public class TraceFactory { public static Trace getTrace (String type) { if (type.equals("file" ) return new FileTrace (); else if (type.equals("system" ) return new SystemTrace (); } }
这样客户端直接用类名调用就可以得到相应的对象
相比于通过构造器 (new)创建对象:
静态工厂方法可具有指定的更有意义的名称
不必在每次调用的时候的都创建新的工厂对象
可以返回原返回类型的任意子类型
优点与不足分析
优点
不会在客户端代码中含有特定的实现类
代码只处理接口,所以它可以与用户定义的实现类一起使用
不足:
结构型模式(Structural patterns)
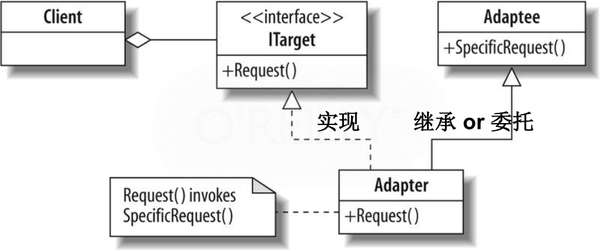
适配器模式(Adapter)
适配器模式意图将某个类/接口转换为用户期望的其他形式,它可以
解决类之间接口不兼容的问题
通过增加一个接口,将以存在的子类封装起来,用户只需面向接口编程,从而隐藏了具体子类
说白了,就是将旧的组件包装(wrapper)一下,用于新系统,下图就很直观:
适配器可以用两种形式实现:继承 (Inheritance)和委托 (Delegation)
举例
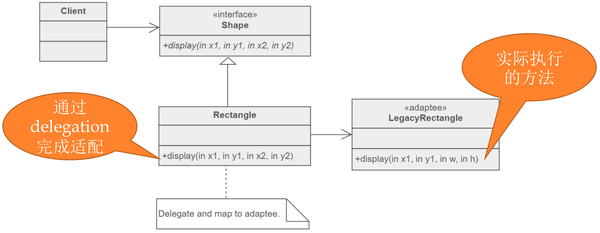
比如有一个显示矩形图案的程序,LegacyRectangle中的display()方法接受左上角坐标(x, y),宽(w),高(h)四个参数来实现功能
但是客户端想要通过传递左上角和右下角的坐标来实现功能
这样就造成了接口与用户期望的不协调,这种不协调就可以通过一个适配器对象 利用委托 机制来解决:
代码:
1 2 3 4 5 6 7 8 9 10 11 12 13 14 15 16 17 18 19 20 21 interface Shape { void display (int x1, int y1, int x2, int y2) ; } class Rectangle implements Shape { void display (int x1, int y1, int x2, int y2) { new LegacyRectangle ().display(x1, y1, x2-x1, y2-y1); } } class LegacyRectangle { void display (int x1, int y1, int w, int h) {...} } class Client { Shape shape = new Rectangle (); public display () { shape.display(x1, y1, x2, y2); } }
装饰器模式(Decorator)
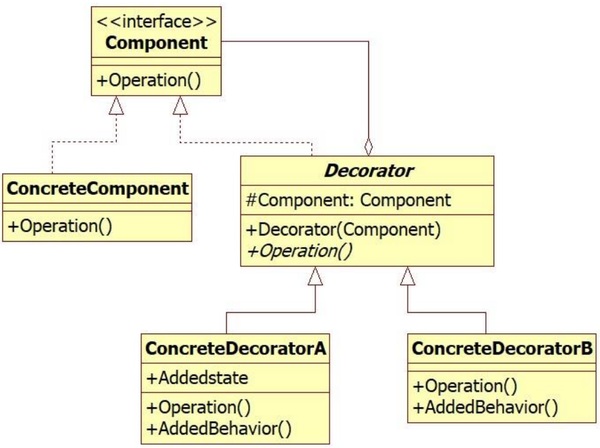
装饰模式 允许通过将对象放入包含行为的特殊封装对象中来为原对象绑定新的行为
假设要为对象增加不同侧面的特性,那么就可以通过装饰器模式来解决,为每一个特性构造子类,通过委托 机制增加到对象上
Component接口定义装饰器执行的公共操作ConcreteComponent起始对象 ,在其基础上增加功能,将通用的方法放到此对象中Decorator抽象类使所有装饰类的基类,里面包含的成员变量component指向了被装饰的对象ConcreteDecorator使添加了功能的类,每个类都代表一个可以添加的特性
举例
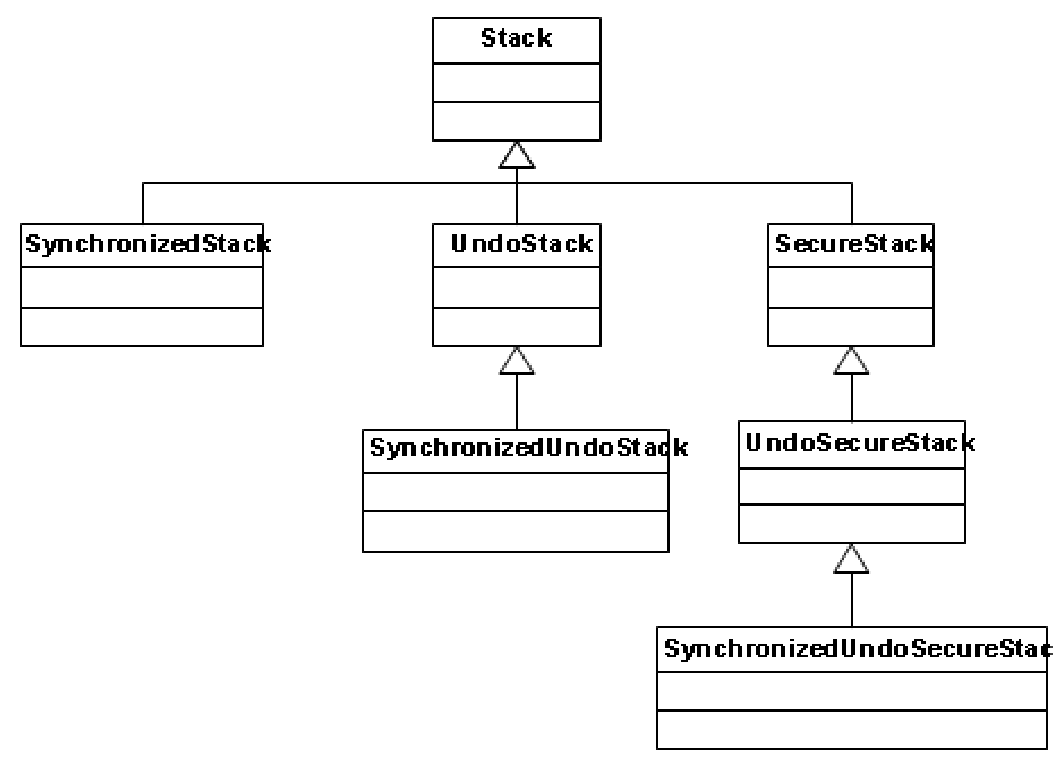
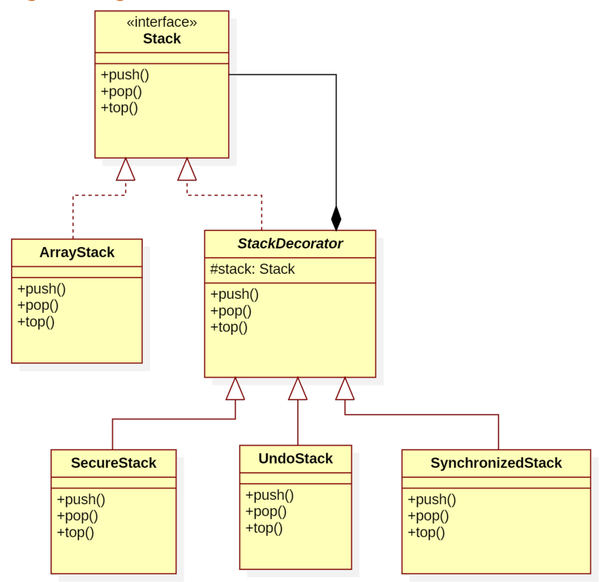
比如,假设想要扩展Stack数据结构:
UndoStack:可以撤销之前pop或push操作的栈SecureStack:需要密码的栈SynchronizedStack:序列化并发访问的栈
我们可以通过继承原始的父类来实现这些特性
但是如果需要这些特性的组合呢?比如:
SecureUndoStack:需要密码的栈,还允许撤消之前的操作SynchronizedUndoStack:序列化并发访问的栈,还允许撤消之前的操作
那么这个时候来怎么办呢?如果简简单单地继续往下继承:
这样不仅会使继承树变得很深,还会在子类中多次实现相同的功能,有大量的代码重复
这时就能用装饰器模式解决问题:
首先实现接口,完成最基础的Stack功能:
1
2
3
4
5
6
7
8
9
10
11
12
13
14
15
interface Stack { void push (Item e) ; Item pop () ; } public class ArrayStack implements Stack { ... public ArrayStack () {...} public void push (Item e) { ... } public Item pop () { ... } ... }
然后设计Decorator基类:
1
2
3
4
5
6
7
8
9
10
11
12
13
public abstract class StackDecorator implements Stack { protected final Stack stack; public StackDecorator (Stack stack) { this .stack = stack; } public void push (Item e) { stack.push(e); } public Item pop () { return stack.pop(); } ... }
具体功能的实现类就通过委托 基类实现:
1
2
3
4
5
6
7
8
9
10
11
12
13
14
15
16
17
18
public class UndoStack extends StackDecorator { private final UndoLog log = new UndoLog (); public UndoStack (Stack stack) { super (stack); } public void push (Item e) { super .push(e); log.append(UndoLog.PUSH, e); } public void undo () { } ... }
如果客户端只需要最基础的功能:
1 Stack s = new ArrayStack ();
如果需要某个特性,比如撤销功能:
1 Stack t = new UndoStack (new ArrayStack ());
如果既需要撤销,又需要密码功能SecureUndoStack,就可以这样实现:
1
2
3
4
Stack t = new SecureStack ( new SychronizedStack ( new UndoStack (s)) )
客户端需要的多个特性通过一层一层的装饰来实现,就像一层一层的穿衣服
有同学可能对这个代码执行过程还存有疑问,我们再举一个更直观的例子:
我们设计一个冰淇凌,冰淇淋的顶部可以有多种水果:
分别设计顶层接口,基础实现,和装饰器基类:
1
2
3
4
5
6
7
8
9
10
11
12
13
14
15
16
17
18
public interface IceCream { void AddTopping () ; } public class PlainIceCream implements IceCream { @Override public void AddTopping () { System.out.println("Plain IceCream ready for some toppings!" ); } } public abstract class ToppingDecorator implements IceCream { protected final IceCream input; public ToppingDecorator (IceCream i) { this .input = i; } public abstract void AddTopping () ; }
然后再添加不同的特性:
1
2
3
4
5
6
7
8
9
10
11
12
13
14
15
public class CandyTopping extends ToppingDecorator { public CandyTopping (IceCream i) { super (i); } public void AddTopping () { input.AddTopping(); System.out.println("Candy Topping added!" ); } } public class NutsTopping extends ToppingDecorator { } public class PeanutTopping extends ToppingDecorator { }
当我们的客户端需要一个添加Candy,Nuts,Peanut的冰淇淋时就可以这样调用:
1
2
3
4
5
IceCream a = new PlainIceCream ();IceCream b = new CandyTopping (a);IceCream c = new PeanutTopping (b);IceCream d = new NutsTopping (c);d.AddTopping();
当调用d.AddTopping()时:
由于d是子类NutsTopping的对象,所以先会调用NutsTopping中的AddTopping()方法,而该方法先调用input.AddTopping()也就是上一层的AddTopping()方法
所以,d会先从基础实现开始依次实现特定功能
这时一个类似于递归 的过程,最后输出如下:
1
2
3
4
Plain IceCream ready for some toppings! Candy Topping added! Peanut Topping added! Nuts Topping added!
Decorator vs. inheritance
装饰器:
在运行时 将特性组合起来
由多个对象协作组成
可以混合多种特性
继承:
在编译时 将特性组合
继承产生一个单一 、形式明确 的对象
多继承 是很难实现的
java.util.Collections中的装饰器
Java中的一些可变聚合类型(List, Set, Map),可以利用Collections类中的装饰器 添加某些特性
比如变成不可变类型
1
2
List<Trace> ts = new LinkedList <>(); List<Trace> ts2 = (List<Trace>) Collections.unmodifiableCollection(ts);
行为类模式(Behavioral patterns)
策略模式(Strategy)
策略模式要解决这样的问题:定义一系列算法, 并将每种算法分别放入独立的类中, 以使算法的对象能够相互替换
比如,排序有很多算法(冒泡,归并,快排)
我们可以为不同的实现算法构造抽象接口,利用委托,在运行时动态传入客户端倾向的算法类实例
优点
可以轻松扩展新的算法实现
将算法从客户端代码中分离出来
举例
在电子商务应用中需要实现各种支付方法, 客户选中希望购买的商品后需要选择一种支付方式: Paypal 或者信用卡
先设计支付策略接口:
1
2
3
public interface PaymentStrategy { public void pay (int amount) ; }
实现信用卡支付策略:
1
2
3
4
5
6
7
8
9
10
11
12
13
14
15
16
17
public class CreditCardStrategy implements PaymentStrategy { private String name; private String cardNumber; private String cvv; private String dateOfExpiry; public CreditCardStrategy (String nm, String ccNum, String cvv, String expiryDate) { this .name=nm; this .cardNumber=ccNum; this .cvv=cvv; this .dateOfExpiry=expiryDate; } @Override public void pay (int amount) { System.out.println(amount +" paid with credit card" ); } }
实现 Paypal 支付策略:
1
2
3
4
5
6
7
8
9
10
11
12
public class PaypalStrategy implements PaymentStrategy { private String emailId; private String password; public PaypalStrategy (String email, String pwd) { this .emailId=email; this .password=pwd; } @Override public void pay (int amount) { System.out.println(amount + " paid using Paypal." ); } }
然后利用委托调用相应算法:
1
2
3
4
5
6
7
public class ShoppingCart { ... public void pay (PaymentStrategy paymentMethod) { int amount = calculateTotal(); paymentMethod.pay(amount); } }
客户端代码:
1
2
3
4
5
6
7
8
9
10
11
public static void main (String[] args) { ShoppingCart cart = new ShoppingCart (); Item item1 = new Item ("1234" ,10 ); Item item2 = new Item ("5678" ,40 ); cart.addItem(item1); cart.addItem(item2); cart.pay(new PaypalStrategy ("myemail@exp.com" , "mypwd" )); cart.pay(new CreditCardStrategy ("Alice" , "1234" , "786" , "12/18" )); }
模板模式(Template Method)
模板方法模式 在超类中定义了一个算法的框架, 允许子类在不修改结构的情况下重写算法的特定步骤
就是做事情的步骤一样,但是具体方法不同:
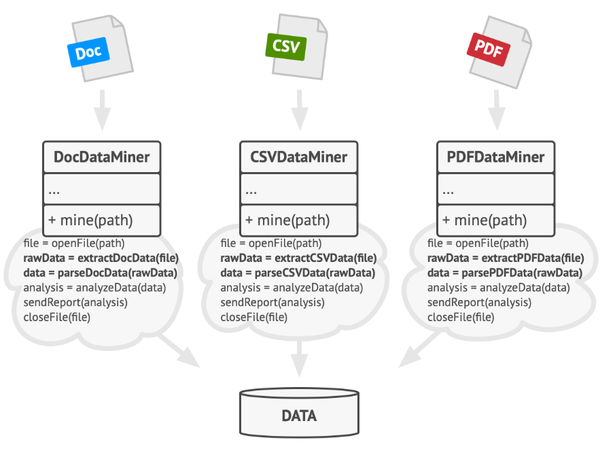
比如从不同类型的文件中进行读操作,对于不同文件,这个操作的步骤相同,但是具体实现不同
这时,可以把共性的步骤放在抽象类内公共实现,差异化的步骤在各个子类中实现。模板方法定义了一个算法的步骤,并允许子类为一个或多个步骤提供实现
模板模式通过继承和重写来实现,这种模式广泛用于各种框架 (frameworks)中
举例
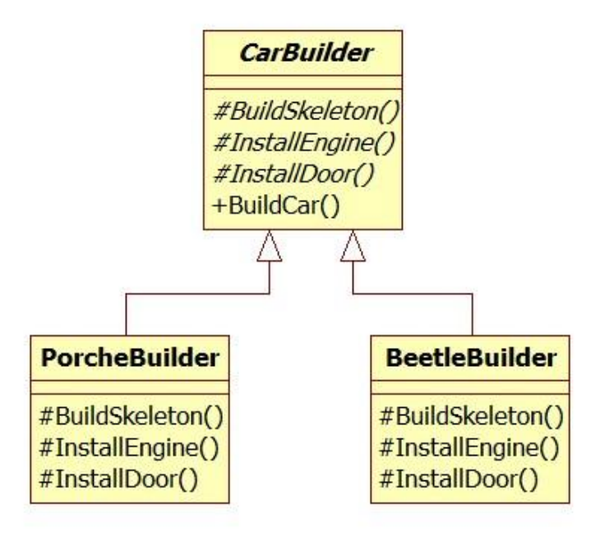
我们需要实现两种汽车生产的过程,显然步骤都相同,但是具体实现会有差异
先实现一个抽象类,BuildCar中给出了生产车辆的步骤:
1
2
3
4
5
6
7
8
9
10
11
public abstract class CarBuilder { protected abstract void BuildSkeleton () ; protected abstract void InstallEngine () ; protected abstract void InstallDoor () ; public void BuildCar () { BuildSkeleton(); InstallEngine(); InstallDoor(); } }
然后再为车进行具体实现:
1
2
3
4
5
6
7
8
9
10
11
12
13
14
15
16
17
18
19
20
21
22
public class PorcheBuilder extends CarBuilder { protected void BuildSkeleton () { System.out.println("Building Porche Skeleton" ); } protected void InstallEngine () { System.out.println("Installing Porche Engine" ); } protected void InstallDoor () { System.out.println("Installing Porche Door" ); } } public class BeetleBuilder extends CarBuilder { protected void BuildSkeleton () { System.out.println("Building Beetle Skeleton" ); } protected void InstallEngine () { System.out.println("Installing Beetle Engine" ); } protected void InstallDoor () { System.out.println("Installing Beetle Door" ); } }
再比如白盒框架,框架已经将某个功能的步骤再抽象类中写好了,我们使用该框架时只需要重写对应的方法即可
迭代器模式(Iterator)
解决这样的问题:在不暴露集合底层表现形式 (列表、 栈和树等) 的情况下遍历集合中所有的元素
结构
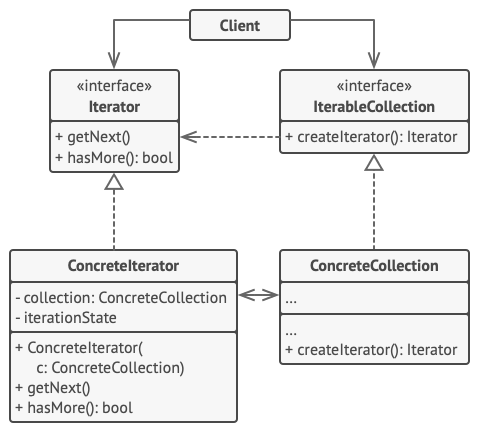
该模式的结构:
Iterator接口:声明了遍历集合所需的操作: 获取下一个元素、 获取当前位置和重新开始迭代等Concrete Iterators实现类:实现遍历集合的一种特定算法。 迭代器对象必须跟踪自身遍历的进度。 这使得多个迭代器可以相互独立地遍历同一集合Collection接口:声明一个或多个方法来获取与集合兼容的迭代器。 注意, 返回方法的类型必须被声明为迭代器接口, 因此具体集合可以返回各种不同种类的迭代器Concrete Collections实现类:在客户端请求迭代器时返回一个特定的具体迭代器类实体
简单来说,就是让自己的集合类实现Iterable接口,并实现自己的独特Iterator迭代器(hasNext, next, remove),允许客户端利用这个迭代器进行显式或隐式的迭代遍历:
1
2
3
for (E e : collection) { … }Iterator<E> iter = collection.iterator(); while (iter.hasNext()) { … }
举例
1
2
3
4
5
6
7
8
9
10
11
12
13
14
15
16
17
18
19
public class Pair <E> implements Iterable <E> { private final E first, second; public Pair (E f, E s) { first = f; second = s; } public Iterator<E> iterator () { return new PairIterator (); } private class PairIterator implements Iterator <E> { private boolean seenFirst = false , seenSecond = false ; public boolean hasNext () { return !seenSecond; } public E next () { if (!seenFirst) { seenFirst = true ; return first; } if (!seenSecond) { seenSecond = true ; return second; } throw new NoSuchElementException (); } public void remove () { throw new UnsupportedOperationException (); } } }
访问者模式(Visitor)
它能将算法与其所作用的对象隔离开来
这种模式可以为 ADT 预留一个将来可扩展功能的接入点,外部实现的功能代码可以在不改变 ADT 本身的情况下在需要时通过委托接入 ADT
举例
想想这样一个问题,需要查看超市货架的物品
先设计数据操作的抽象接口:
1 2 3 4 public interface ItemElement { public int accept (ShoppingCartVisitor visitor) ; }
然后为每种商品具体实现:
1 2 3 4 5 6 7 8 9 10 11 12 13 14 15 16 public class Book implements ItemElement { private double price; ... int accept (ShoppingCartVisitor visitor) { visitor.visit(this ); } } public class Fruit implements ItemElement { private double weight; ... int accept (ShoppingCartVisitor visitor) { visitor.visit(this ); } }
设计访问者接口:
1 2 3 4 5 public interface ShoppingCartVisitor { int visit (Book book) ; int visit (Fruit fruit) ; }
客户端实现一种visitor:
1
2
3
4
5
6
7
8
9
10
11
12
13
14
15
16
public class ShoppingCartVisitorImpl implements ShoppingCartVisitor { public int visit (Book book) { int cost=0 ; if (book.getPrice() > 50 ){ cost = book.getPrice()-5 ; }else cost = book.getPrice(); System.out.println("Book ISBN::" +book.getIsbnNumber() + " cost =" +cost); return cost; } public int visit (Fruit fruit) { int cost = fruit.getPricePerKg()*fruit.getWeight(); System.out.println(fruit.getName() + " cost = " +cost); return cost; } }
客户端均通过visitor的实现类来访问数据,比如设计计算价格和的方法:
1
2
3
4
5
6
7
8
9
10
11
12
13
14
15
16
public class ShoppingCartClient { public static void main (String[] args) { ItemElement[] items = new ItemElement []{ new Book (20 , "1234" ),new Book (100 , "5678" ), new Fruit (10 , 2 , "Banana" ), new Fruit (5 , 5 , "Apple" )}; int total = calculatePrice(items); System.out.println("Total Cost = " +total); } private static int calculatePrice (ItemElement[] items) { ShoppingCartVisitor visitor = new ShoppingCartVisitorImpl (); int sum=0 ; for (ItemElement item : items) sum = sum + item.accept(visitor); return sum; } }
这样,如果后续想要改变算法,只要更换visitor即可
Visitor vs. Iterator
这两者功能很相似,我们来做个对比:
迭代器:以遍历的方式访问集合数据而无需暴露其内部表示,将遍历这项功能委托 给到外部的iterator对象
访问者:在特定 ADT 上执行某种特定操作,但该操作不在 ADT 内部实现,而是委托给独立的visitor对象,客户端可灵活扩展/改visitor的操作算法,而不影响 ADT
Strategy vs. Visitor
相同点:
两者都是通过委托 建立两个对象的动态联系
区别:
Visitor 强调的是外部定义某种对 ADT 的操作,该操作与 ADT 自身关系不大(只是访问ADT),故ADT内部只需要开放accept(visitor)即可,客户端通过它设定visitor操作并在外部调用
Strategy则强调是对 ADT 内部某些要实现的功能的相应算法的灵活替换。这些算法是 ADT 功能的重要组成部分,只不过是委托 到外部strategy类而已
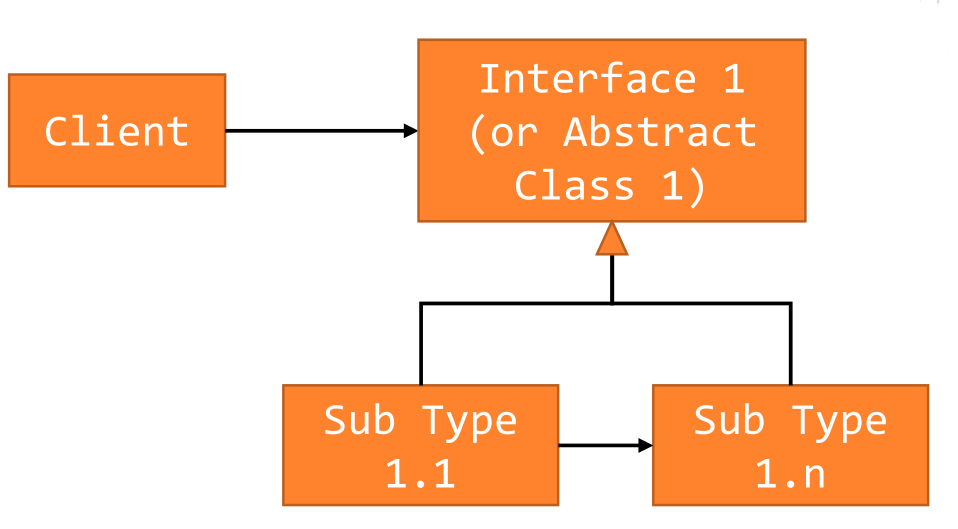
设计模式的共性
共性样式:继承
特点就是只使用继承 ,而不使用委托
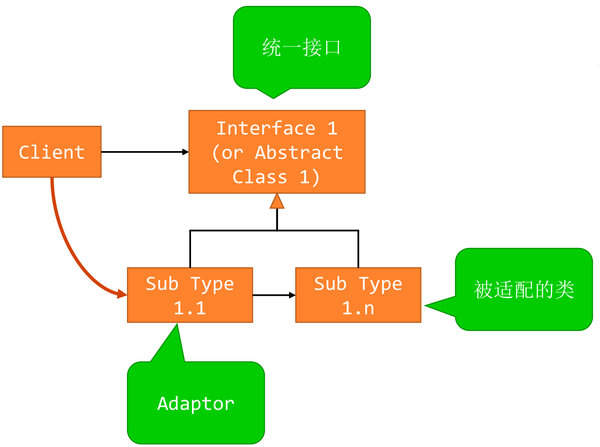
比如,适配器模式 (Adaptor)
适用场合 :已经有了一个类,但是其方法与目前客户端的需求不一致
根据 OCP 原则,不能修改这个类,所以扩展一个adptor和一个统一的接口
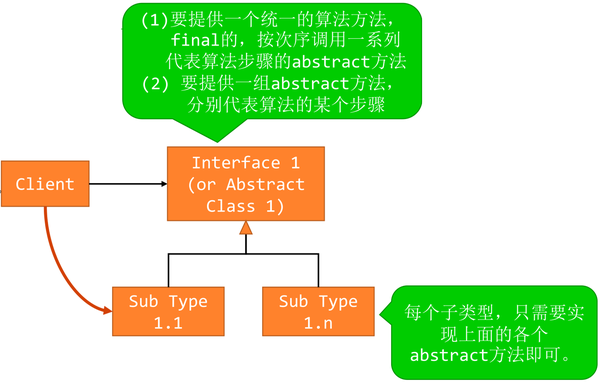
模板模式 (Template)
适用场合 :有共性的算法流程,但算法各步骤有不同的实现,典型的“将共性提升至超类型,将个性保留在子类型”
注意:如果某个步骤不需要有多种实现,直接在该抽象类里写出共性实现即可(需要时将方法设置为final,不允许override)
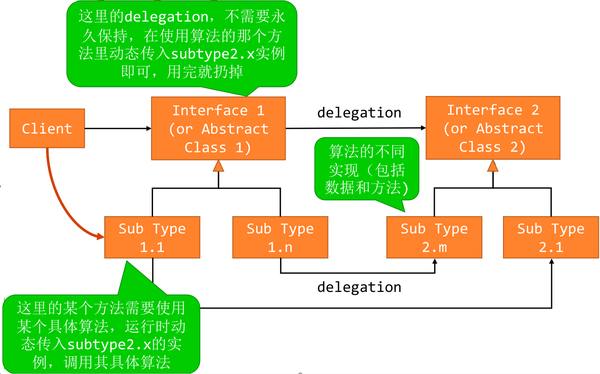
共性样式:继承+委托
特点就是有两颗继承树 ,有两个层次的委托
比如,策略模式 (Strategy)
根据 OCP 原则,想有多个算法的实现,在右侧树里扩展子类型即可,在左侧子类型里传入不同的类型实例
迭代器模式 (Iterator)
工厂方法模式 (Factory Method)
左右两棵树的子类型一一对应,如果工厂方法里使用Type表征右侧的子类型,那么左侧的子类型只要 1 个即可
访问者模式 (Visitor)
左右两侧的两棵树的子类型,基本上是一一对应,但左侧树中的不同子类型可能对应右侧树中的同一个子类型visitor
总结